These are screenshots of the web console, and the operation of various parts of the console. The server includes a number of other standard programs which are not shown here. You can find more information on these programs at these links:
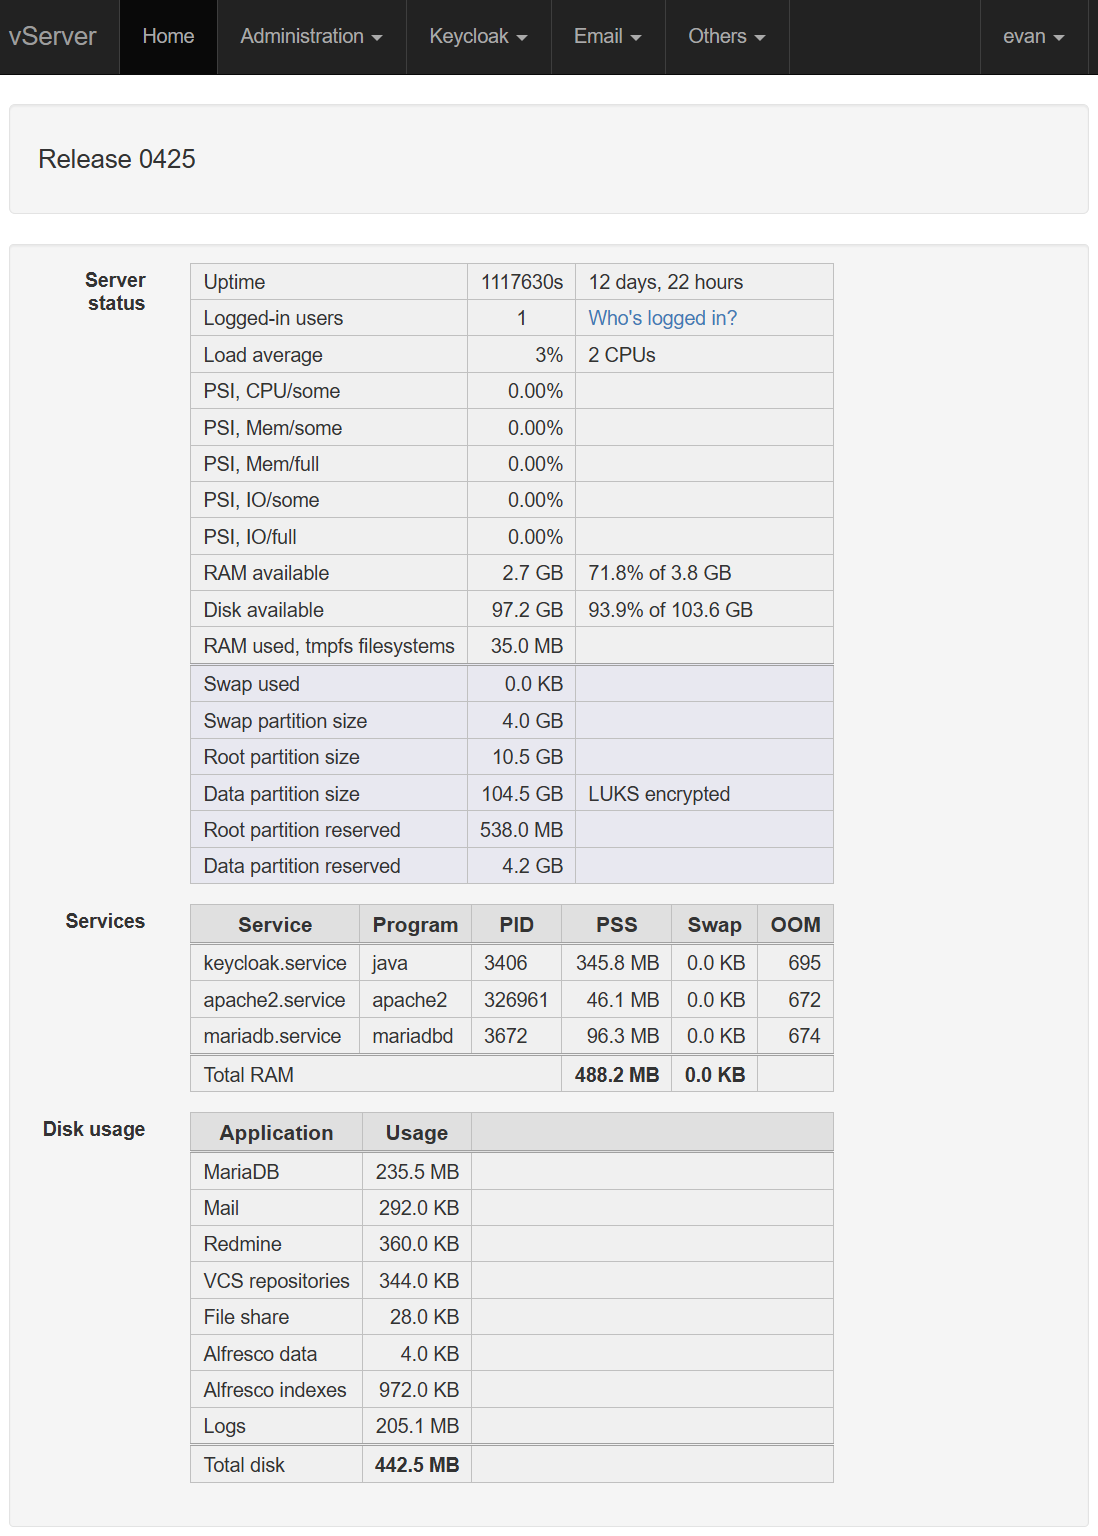
Your server's operation is controlled from the web console. This is a screenshot of the front page, which provides a real-time overview of the server status and loading. This is only visible if the user is signed in and has an AdminRead or an AdminWrite claim. These claims authorise use of the console.
The status includes the current uptime, the number of users logged in on ssh, who they are, the system loading, the available RAM and disk storage, and so on.
A subset of the status information is emailed to the site admin twice a day, to confirm that the server is still operational. These heartbeat emails also include a notification if a manual restart is required (this will happen if a security update was automatically installed, but you didn't select automatic restarts during site configuration).
When security updates are enabled, the reported uptime is unlikely to be longer than 2 weeks or so.
The 'Administration' menu includes various miscellaneous operations. The screenshot shows the 'Downloads' sub-menu. This includes selections for:
- The reference manuals
- A sample .gitconfig file for OAuth 2.0 operation
- Your DNS Zone file, LUKS header, and Alfresco and Solr keystores
- A list of files and directories to be backed up. This file is used by the Burp backup utility, and rsync
- ssh key pairs. The key format is selectable, and the private key can be encrypted if necessary; a new key pair is generated on each download operation

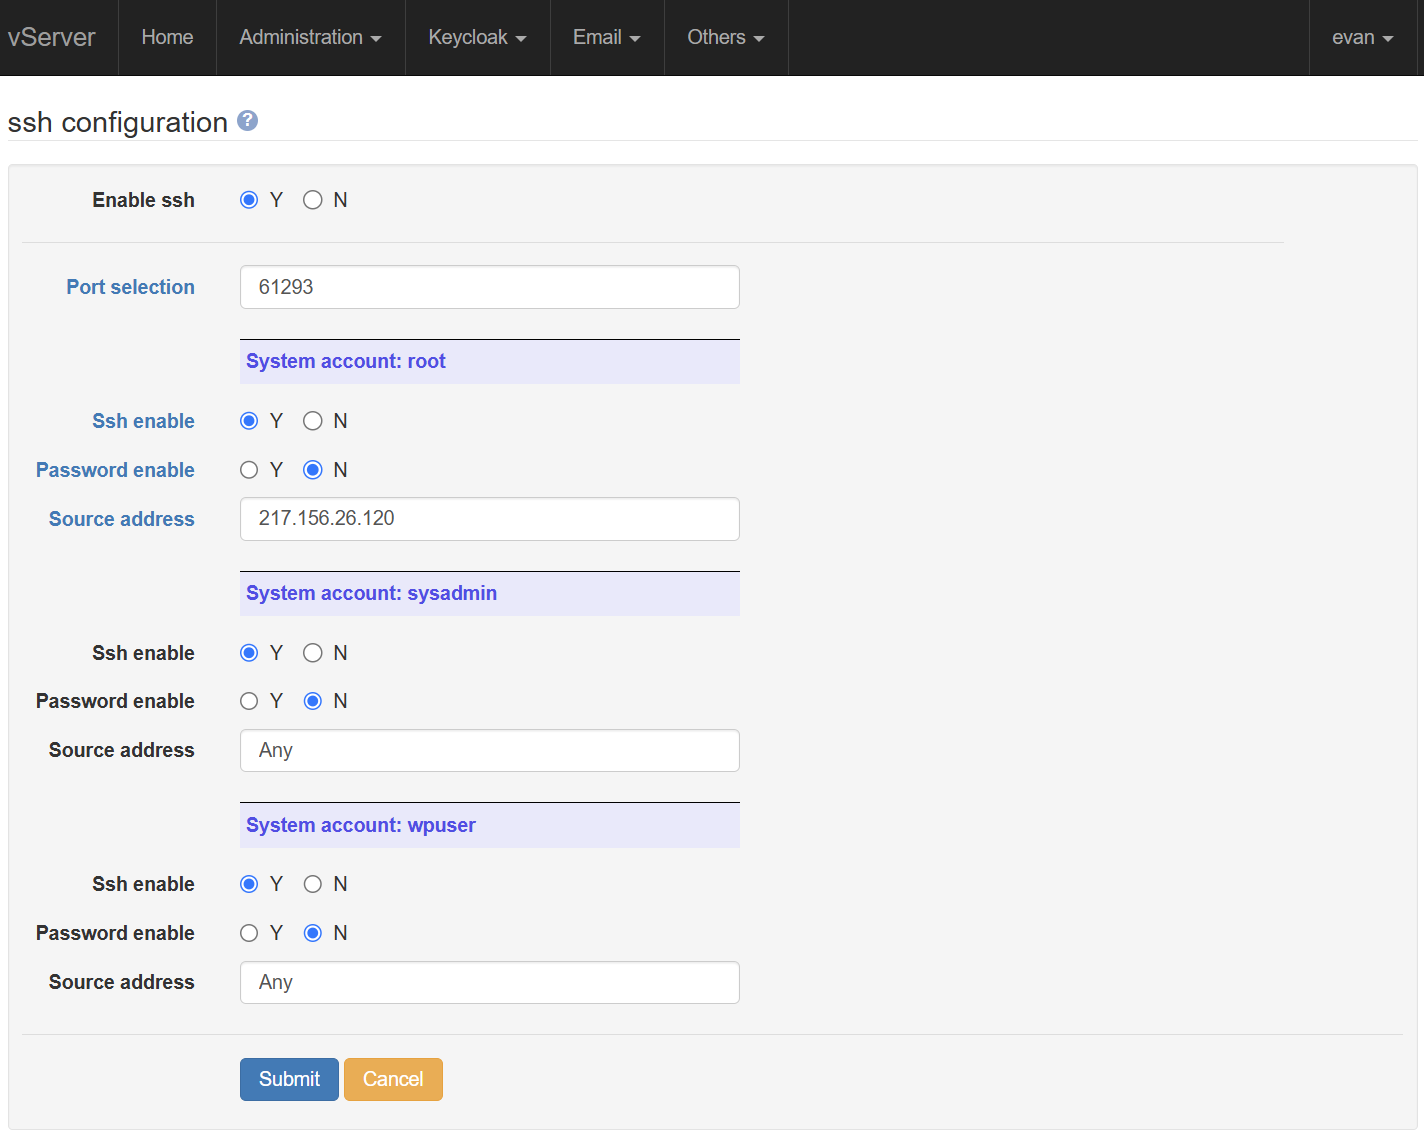
ssh can be configured entirely from the console, for all 3 system users (root, sysadmin, and wpuser), avoiding the need to manually modify any configuration files. ssh can be enabled globally, or individually for each system user. A source address pattern allows you to restrict the IP addresses that a given system user can connect from, if necessary.
The ssh port is selected randomly during system configuration, to avoid automated attacks on port 22. You can select a different port at any time after configuration.
Password login can be selectively enabled, but the default is to allow only public key authentication. The main Administration menu allows you to both generate and download key pairs (PuTTY, OpenSSH, or OpenSSL), and to upload a public key.
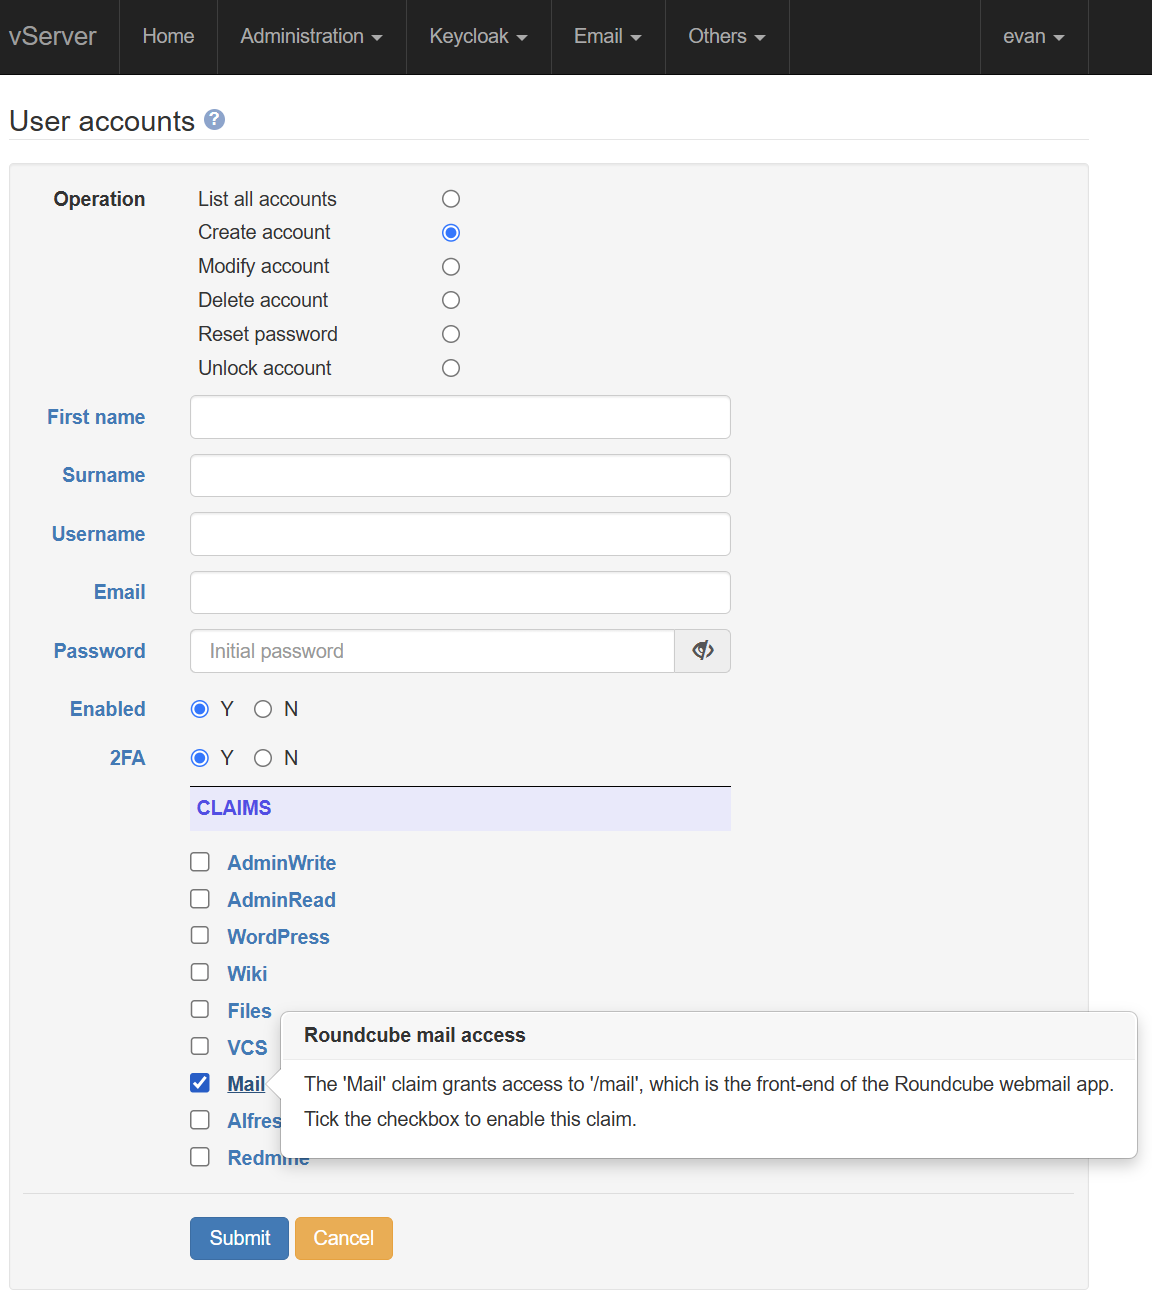
The Keycloak user accounts page allows you to create, edit, and delete your front-end users. Your "front end" users are the users who will access your system from a browser, or a CLI program such as a Git or Subversion client; they are not your Linux system users. You can do this directly from Keycloak's admin UI if necessary, but the web console interface is far simpler, and centralises all user operations.
Access to the system is defined through a set of claims. A VCS claim, for example (abbreviated to VC in the screenshot) grants a user access to the repositories, for either CLI usage or browsing.
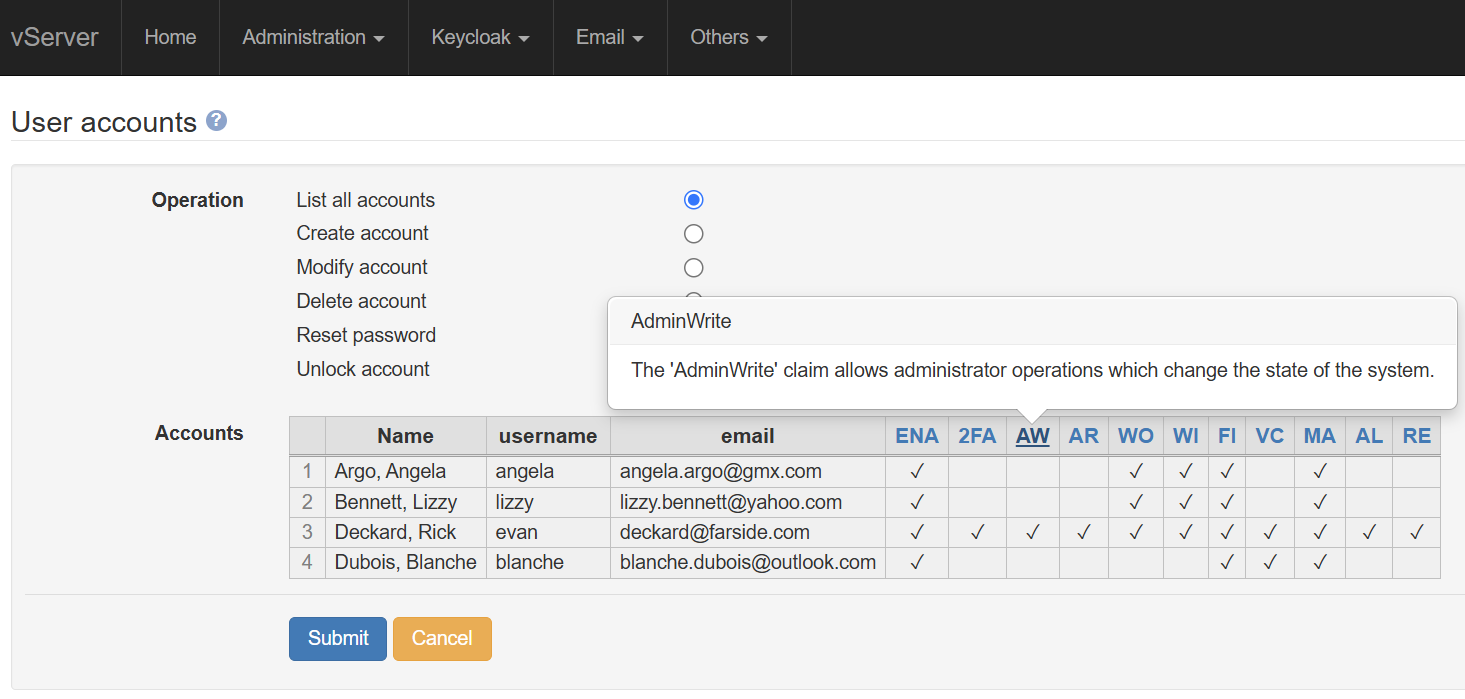
This screenshot shows the information required to create a new user. Any user details can be changed at a later time from the 'Modify account' page, if necessary. The user is given an initial password, and can log in with either a username or an email address. A user can be disabled to temporarily prevent logins. Two-factor authentication is enabled by selecting 'Y' for '2FA' (this is the default).
On first login, the new user must change their password, and set up an authenticator app, if 2FA was selected (the sign in page generates the required QR code). The user must also confirm their email address.
The user's access to the system is defined by a set of claims; you can select zero or more claims when creating (or modifying) the user.
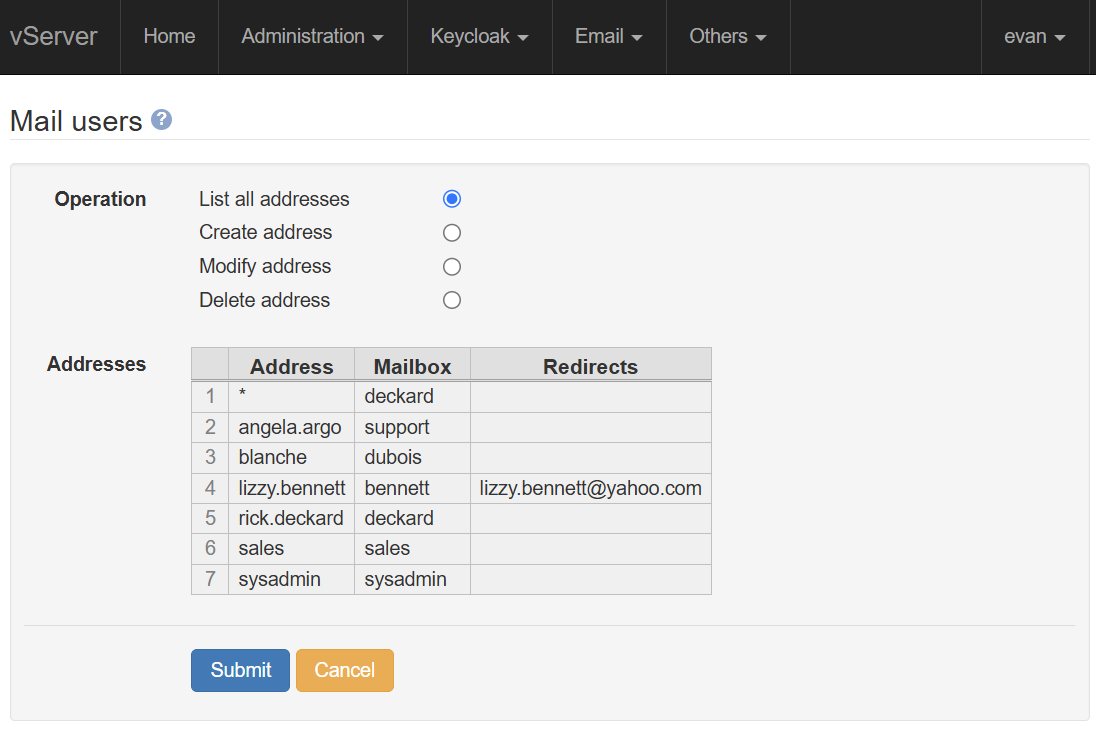
The 'Mail users' and 'Mailboxes' pages are selected from the
'Email' menu. This screenshot shows the default action, which
is simply to display a list of the current mail addresses
handled by the server. For domain mysite.com, for example,
the server will accept emails addressed to
lizzy.
In normal circumstances, you will probably not want to accept any emails which are sent to an address which is not explicitly listed in the 'Address' column. However, this particular setup has a wildcard (*) entry. This will ensure delivery of mails to unrecognised addresses to the 'deckard' mailbox.
Plussed addresses are automatically supported.
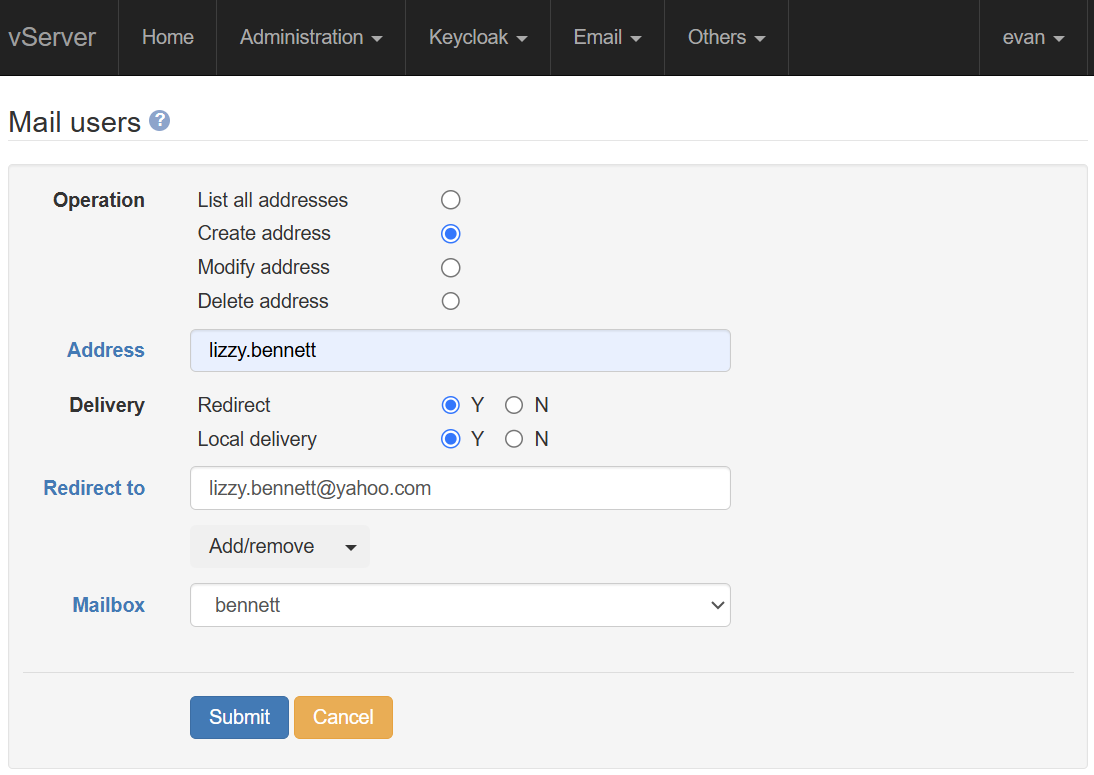
This screenshot shows the information required to create a new mail address. You can create as many addresses as required.
If 'Local delivery' is selected, a specific mailbox must be selected for mail delivery. If 'Redirect' is selected, one or more forwarding addresses can be supplied, and the incoming mail will be forwarded to these addresses.
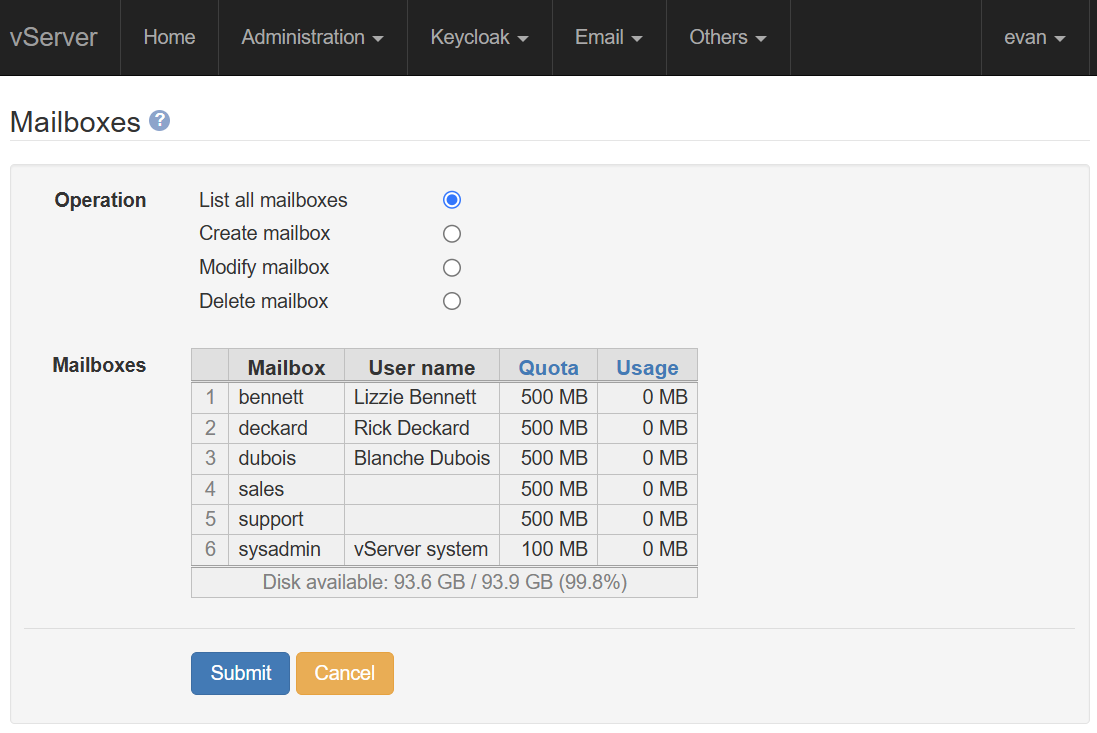
Emails which are accepted locally must be stored in a mailbox, which is a storage area on the server. A mailbox can accept incoming mails to more than one email address (you might have a single 'support' mailbox, for example, which handles multiple addresses).
To access a mailbox, you'll need to use an IMAP-compatible mail client, or the pre-installed Roundcube webmail app (which is also an IMAP client). IMAP clients will pick up incoming emails (almost) immediately; you don't need to manually check the server for new mails.
Mailboxes can have a disk quota set, if desired. Any users of the mailbox will receive warning emails if the size of the mailbox approaches the quota limit. At this point, you will need to either increase the quota limit, or delete some messages.
The mailboxes are located in the /data partition, and so are automatically LUKS-encrypted if encryption has been enabled.
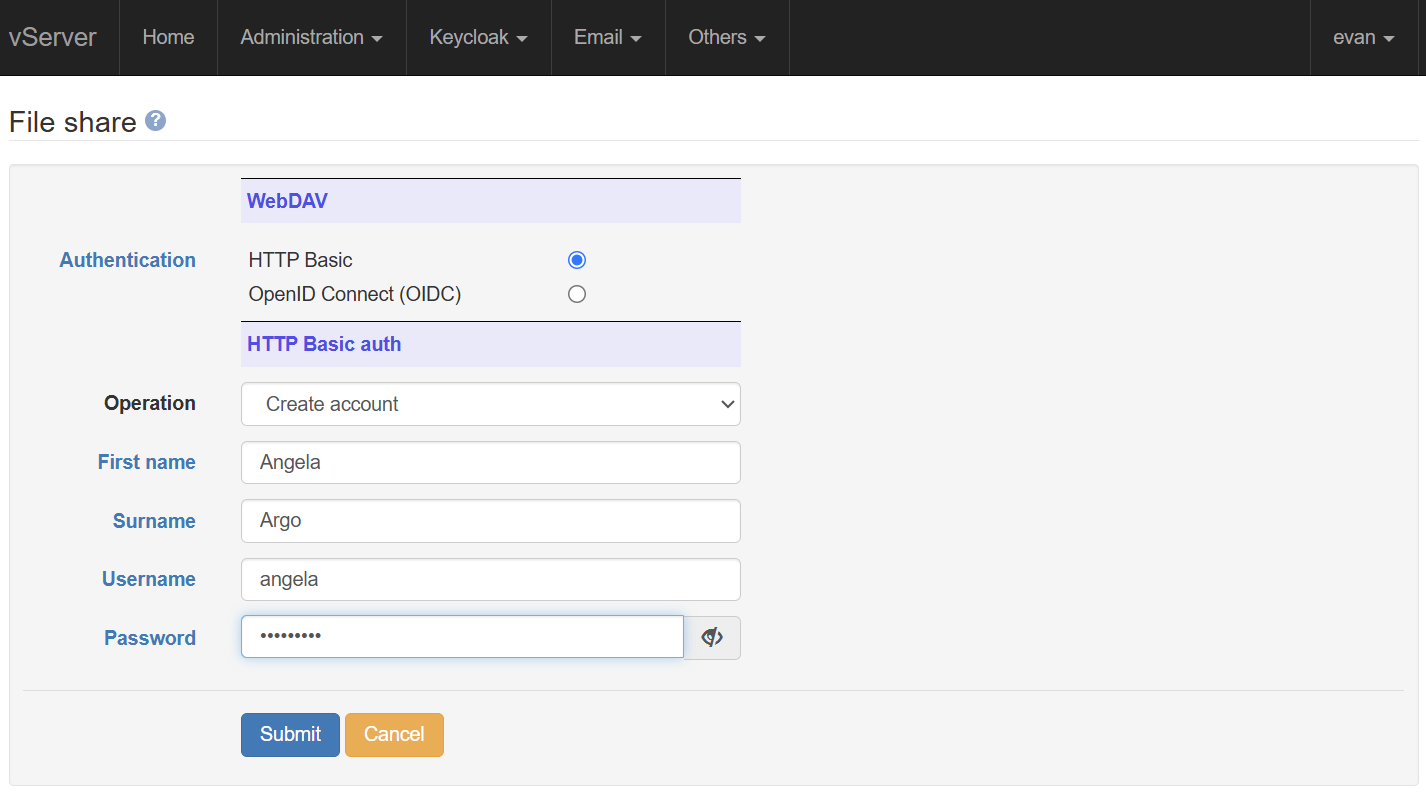
WebDAV is an HTTP extension, and is the industry-standard mechanism which allows web users to remotely manage files on a web server. The file share area is located in the /data partition, and files are automatically LUKS-encrypted if encryption has been enabled.
Signed-in users with a Files
claim can view (or download) the contents of the file share
area, which is reachable at
example.com/files,
for domain example.com. However, it is more usual to use
a File Manager program (such as Windows File Explorer, or
Gnome Files) to create, change, or move documents in the
share area. For File Explorer, for example, you simply need
to select Map Network Drive,
and share folder
https://
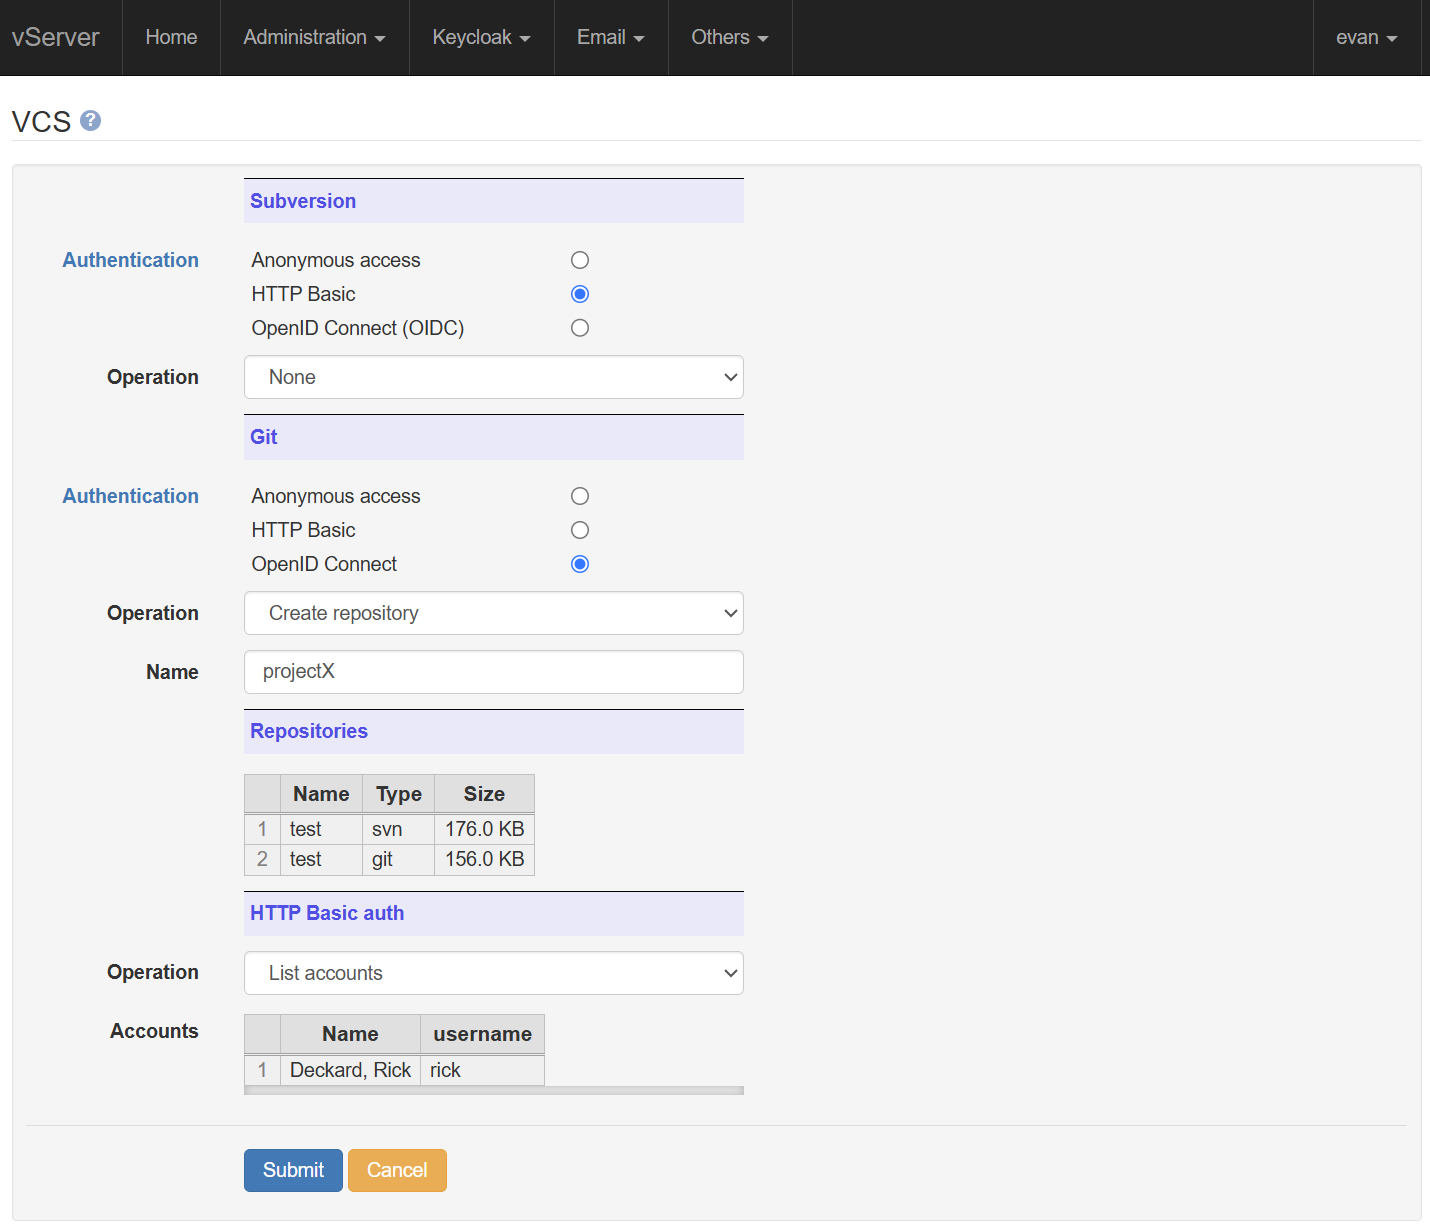
The console allows the remote management of your Git and Subversion repositories. These are again located in the /data partition, and are automatically LUKS-encrypted if encryption has been enabled.
Repos can be created or renamed. For Subversion, you can select between a plain repository layout, or the conventional 'Trunk, branches, tags' layout. Git repos are created as bare.
The screenshot shows four sections:
- Repos may be created or renamed, with authentication selectable as either Anonymous, HTTP Basic, or OIDC for both Subversion and Git
- Existing repos are listed, together with their type and size
- HTTP Basic accounts can be created or managed. In this case, only one account has been created
At the time of writing, Git client programs support OIDC authentication, but the normal Subversion client ('svn') does not. In order to use OIDC with git, you will need to use a Git Credential Helper, and add a credentials section to your .gitconfig file. You can download a sample .gitconfig from the main Administration menu; this contains information on the server's OAuth 2.0 implementation.
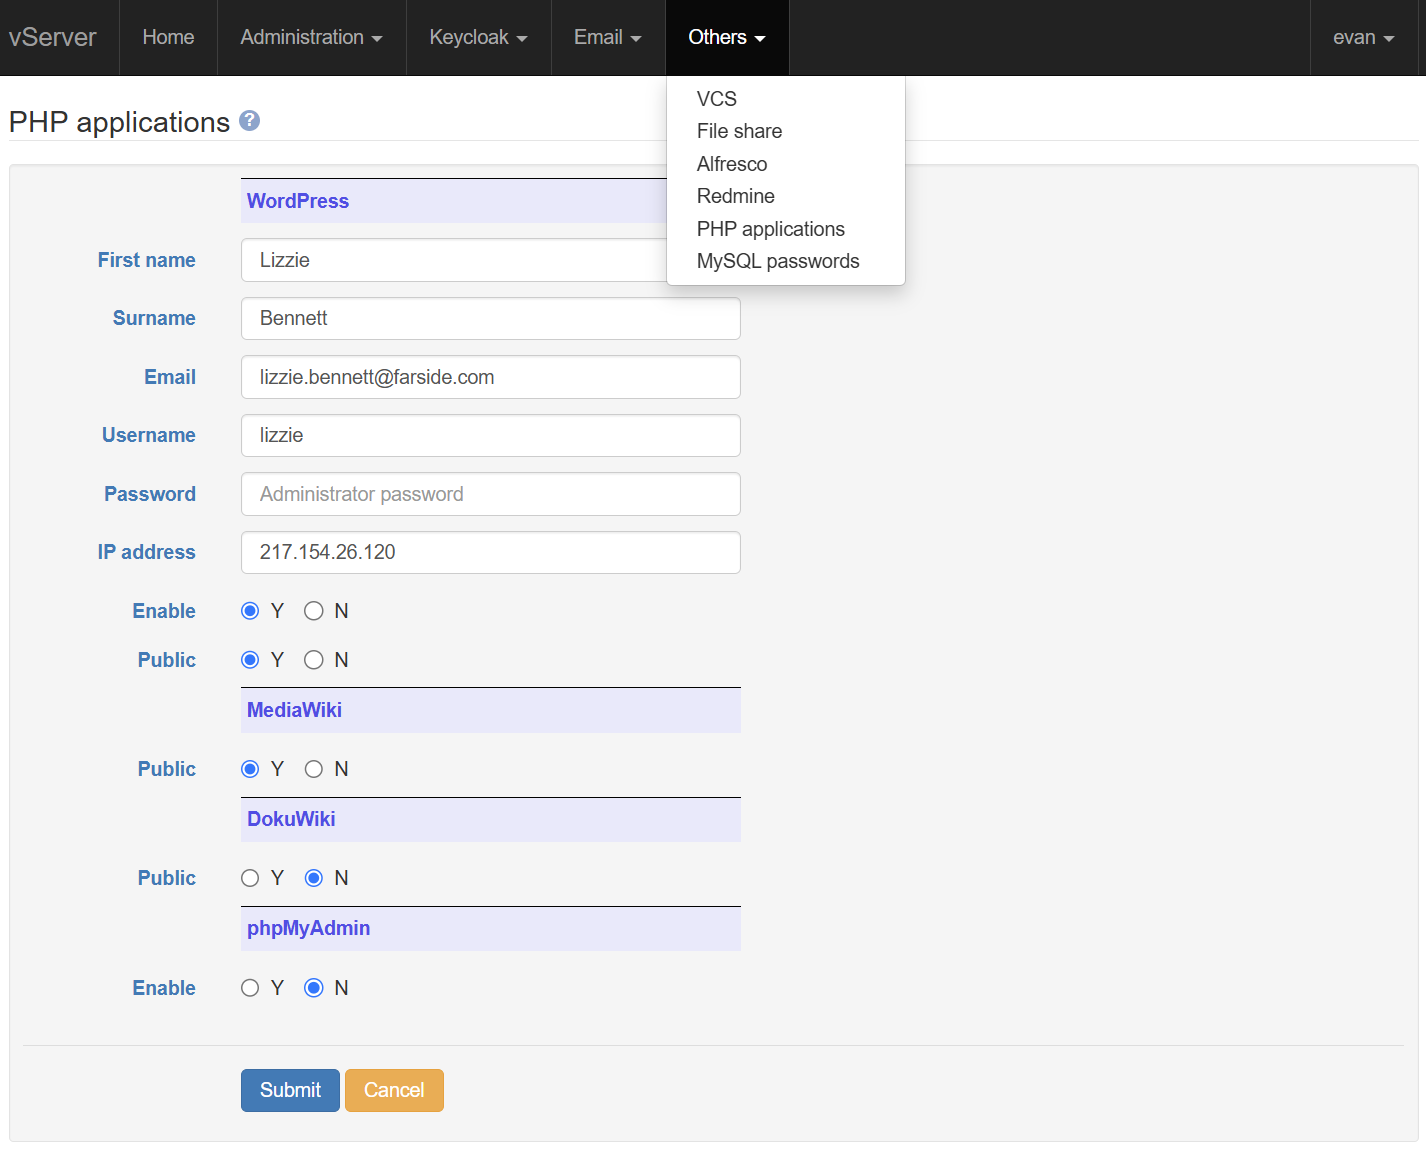
Your WordPress site can be enabled or disabled, and set to public or private access. The defaults are disabled, and private. If enabled, and set to public access, anyone will be able to view your site; if set to private access, however, only signed in users with a WordPress claim will be able to view your site.
The WordPress dashboard (as opposed to the 'site') is always available at /www/wp-admin to signed in users with a WordPress claim. The full site is also visible from the specified IP address, whether or not the site is enabled, to ease site development.
The wikis are always enabled, but must be explicitly set for Public access if they are intended to be visible outside your organisation. When public access is disabled (the default) the wikis are only visible to signed in users who have a Wiki claim.
phpMyAdmin provides a useful and simple front end for database manipulation, but is a potential security risk. It is therefore disabled by default, and must be explictily enabled. A sign in with an AdminWrite claim is also required for access.